https://www.gosh.nhs.uk/conditions-and-treatments/procedures-and-treatments/removing-a-halo-vest-in-an-emergency/
Removing a halo vest in an emergency
The halo vest system is a brace which limits movement and helps protect the cervical spine (the bones in the neck) from damage. It is used to help the bones to heal following injury or surgery.
This leaflet explains how to remove the halo vest system in an emergency. For example, in the event of choking or cardiac arrest.
This leaflet should be read alongside the ‘halo vest system: information for families’ leaflet, which provides more general information about the halo and vest. If you have any questions or concerns, please discuss this with a member of the healthcare team.
Important
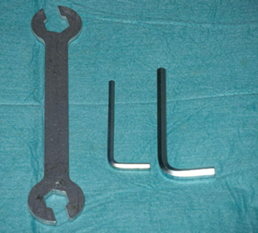
After the halo vest system has been fitted, your child should always carry:
- A spanner
- A large and a small Allen key.
These are usually taped to the front of their halo vest.
It is essential that you always know where these are so they can be rapidly accessed in an emergency.
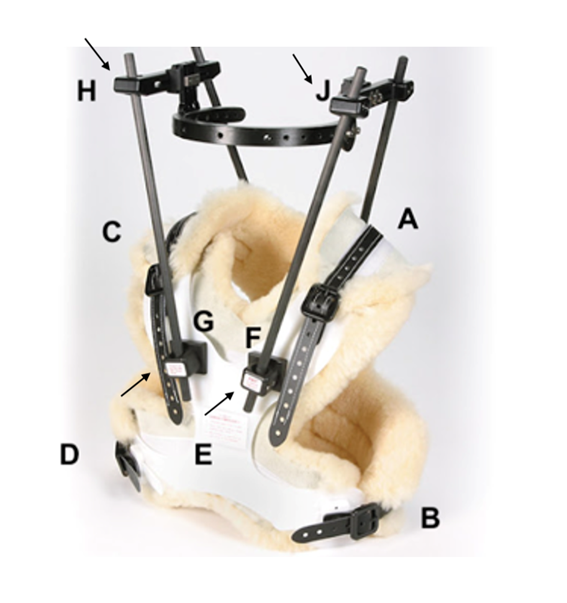
The halo vest
The diagram above shows the halo vest (E):
- Rods are shown with arrows.
Buckles:
- A, C: Shoulder buckles
- B, D: Waist buckles
Connection points:
- F, G: Connection points in the middle of the chest. These connect the front rods to the vest.
- J, H: Connection points on the head. These connect the front rods to the head ring (halo).
Please note that there are two bolts at each connection point. This means there are 8 bolts to loosen in total.
Emergency situations
In the event of emergency, you may need to remove the halo vest to allow access to your child’s chest and tummy. This would include if your child:
- Stopped breathing
- Had a cardiac arrest (their heart stopped working properly)
- Choked
How to remove the front of a halo vest
Always call 999 for help first.
Whilst waiting for the paramedics to arrive, remove the front of the vest:
1. Lie your child flat on a hard surface.
For example, the floor or a table. Not a bed.
2. Release the waist buckles (B, D) and then the shoulder buckles (A, C).
3. Loosen the bolts at the connection points on the head (J and H):
· Use the large Allen key. Turn anti-clockwise (left) to loosen.
· There are two bolts at each connection point.
Loosen the bolts at the connection points on the chest (F and G):
· Use the large Allen key. Turn anti-clockwise (left) to loosen.
· There are two bolts at each connection point.
Do not loosen the bolts at the back of the vest or back of the head.
If someone is with you, ask them to hold your child’s head still to reduce their neck movement.
4. Pull the rods upwards
· You can now pull the front of the vest forwards or remove it. You can now access your child’s chest and tummy.
5. Perform first aid as needed:
CPR:
· The back of the vest does not need to be removed to do CPR, it acts as a ‘crash board’.
Choking:
· Perform abdominal thrusts.
· As the back part of the halo vest is still on, abdominal thrusts are likely to be more effective than back blows in unblocking your child’s airway.
6. Once your child is stable, try to keep them flat until the halo vest has been reconstructed.
· The shell of the vest and the rods should only be put back on by a trained practitioner who is familiar with the equipment.
· If the vest cannot be re-attached, the clinical team may apply a cervical collar until it can be refitted.